Processing Scans and Adding Items to OneDrive
Background
After scanning and photography is complete, it is necessary to process the scans, add the items to OneDrive for storage, and transfer them to external hard drives for final access and preservation.
Processing Scans:
Processing 2D Photos:
Adding Items to OneDrive:
- Adding Documents to OneDrive
- Adding Scanned Images to OneDrive
- Adding Slides to OneDrive
- Adding 2D Photos to OneDrive
- Adding Photogrammetry Photos to OneDrive
- Adding 3D Agisoft Projects to OneDrive
Processing Scans
Processing Images
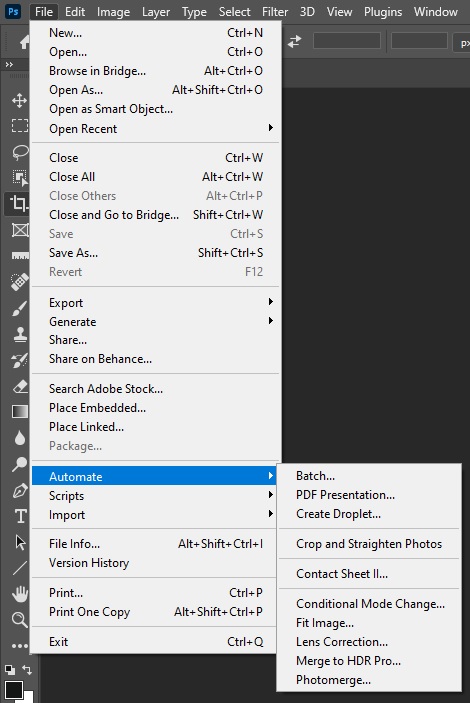
- Open Photoshop
- Then, go to File > Automate > Batch.
- In the Batch window, select the Set ‘photographs’ and for the action select ‘photo tif>jpg’.
- For the Source, make sure folder is selected. Click Choose and select the tif folder where your new scans are stored.
- For the Destination, make sure folder is selected. Click Choose and select the access-JPG folder.
- Make sure the ‘Override’ box is checked under the save side
- Click OK.
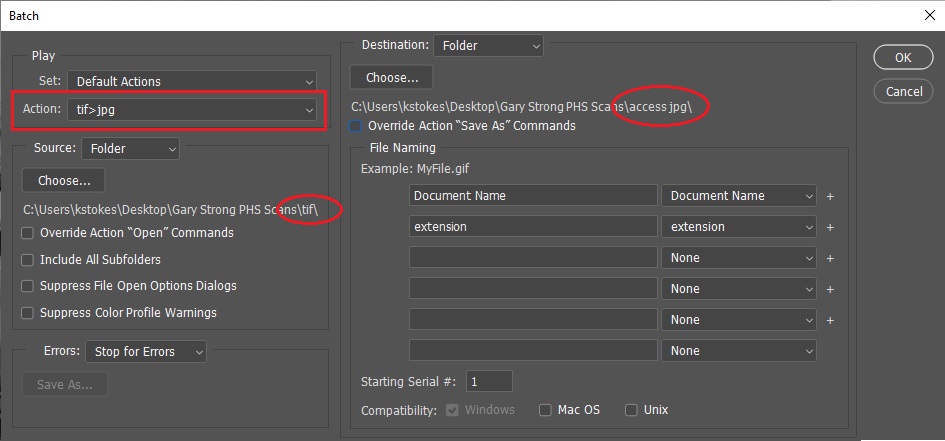
- After Photoshop has completed the action, make sure all the images have scanned/saved to the correct folder.
In the access jpg folder, open images in Photoshop crop colorbar and straighten images. To straighten, use ruler tool>image>image rotation>arbitrary. This will keep the image flat, rather than create layers. Save.
To adjust levels in photoshop go to image>adjustments>levels. A box will pop up, click auto and okay. Save.
Once levels are adjusted, go to image>auto color then try both image>auto contrast and image>auto tone. Whichever of these last two look better, use that and save.
- Once finished with the whole access jpg folder, go back to Photoshop to File > Automate > Batch.
- In the Batch window, select Set ‘photographs’ and select the action ‘accessjpg>lowresjpg’.
- For the Source, make sure folder is selected. Click Choose and select the access jpg folder that contains all the adjusted images you just created.
- For the Destination, make sure folder is selected. Click Choose and select the lowres jpg folder. Make sure the file path reads the correct destination.
- Click OK.
- Save
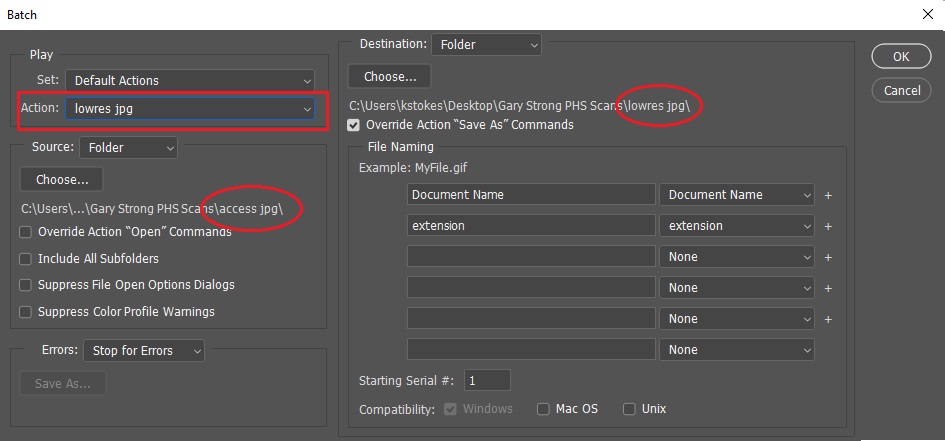
- After Photoshop has completed the action, make sure all the images have been saved to the correct folder. –>
Processing Documents
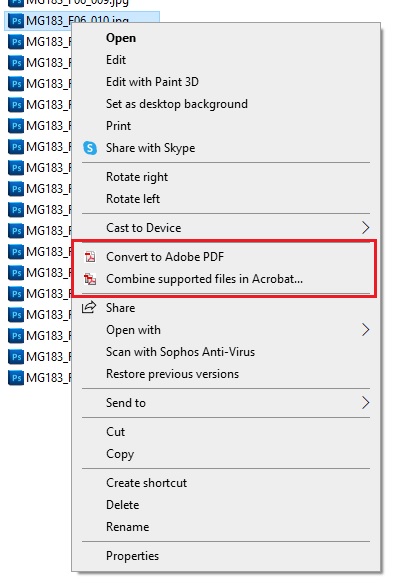
- Select the document file(s) to be converted from your JPG folder.
- Right-click on the .jpg file and select ‘Covert to Adobe PDF’
- If combining multiple page items, select all items, then right-click and select ‘Combine with Adobe Acrobat’
- Then click ‘Combine’ in the new window
- After Adobe opens with the new PDF file, navigate to the toolbar on the right-side of the window
- Expand the toolbar so each tool’s name is viewable (or hover over them to determine which tool is which)
- Select ‘Scan and OCR’
- In the new toolbar that opens above the document, select ‘Text Recognition’

- Wait until Adobe Acrobat completes the command
- Hint: The document will end up back at the first page when it is complete
- Save the document as a PDF following the naming rules established under ‘File Naming’
- Omit the ‘-001’
- In cases of combined documents, Adobe will automatically change the file name to ‘Binder 1’ or somthing similar; rename the file following our guidelines
- When Adobe Acrobat opens, find ‘Tools’ in the top right corner of the screen and select Recognize Text > In this file.
Adding Items to OneDrive:
Adding Documents to OneDrive
Scanned documents saved in your OneDrive will need to be uploaded to the Documents folder in the AWBLA OneDrive.
Download the Documents folder structure prior to scanning
- Navigate to the CLIR-DHC Crabtree folder in the AWBLA OneDrive
- Click the box for the Documents folder
- This folder set is organized as follows:
- BeginHere-Item Name {Folder} (to be edited by you)
- PDF {Folder}
- Processed-JPEG {Folder}
- TIFF {Folder}
- BeginHere-Item Name {Folder} (to be edited by you)
- This folder set is organized as follows:
- Click Download and choose where to save the zip folder, if prompted
- Navigate to the downloaded zip folder (it should be named somthing like OneDrive_2021-10-28.zip)
- Right click the folder and select Extract All
- Click Browse, navigate to and click on your personal OneDrive, then click Extract
- Make sure the Show extracted files when complete box is checked
- Double-click on the Documents folder to open it
- Right-click the BeginHere-Item Name folder, select Rename, and type the Item Name (such as CE_B1_F2_Item430)
Scan documents directly into the renamed item folder in your personal OneDrive
- Scan documents and save coverted documents into their appropriate folders within the renamed item folder
- Save the PDF files (.pdf format) into the PDF parent folder
- Save the JPEG files (.jpeg format) into the Processed-JPEG parent folder
- Save the TIFF files (.tif format) into the TIFF parent folder
Upload the renamed item folder to the AWBLA OneDrive
- Navigate to the CLIR-DHC Crabtree folder in the AWBLA OneDrive
- Double-click on the Documents folder to open it
- Click Upload folder and select Folder
- Navigate to and single click the renamed item folder
- Click Upload to add the folder and subfolders to the Documents folder in the AWBLA OneDrive
Adding Scanned Images to OneDrive
Scanned images saved in your OneDrive will need to be uploaded to the Photos-Negatives folder in the AWBLA OneDrive.
Download the Photos-Negatives folder structure prior to scanning
- Navigate to the CLIR-DHC Crabtree folder in the AWBLA OneDrive
- Click the box for the Photos-Negatives folder
- This folder set is organized as follows:
- BeginHere-Item Name {Folder} (to be edited by you)
- Processed-JPEG {Folder}
- TIFF {Folder}
- BeginHere-Item Name {Folder} (to be edited by you)
- This folder set is organized as follows:
- Click Download and choose where to save the zip folder, if prompted
- Navigate to the downloaded zip folder (it should be named somthing like OneDrive_2021-10-28.zip)
- Right click the folder and select Extract All
- Click Browse, navigate to and click on your personal OneDrive, then click Extract
- Make sure the Show extracted files when complete box is checked
- Double-click on the Photos-Negatives folder to open it
- Right-click the BeginHere-Item Name folder, select Rename, and type the Item Name (such as CE_B76_F4-7)
Scan images directly into the renamed item folder in your personal OneDrive
- Scan images and save coverted images into their appropriate folders within the renamed item folder
- Save the JPEG files (.jpeg format) into the Processed-JPEG parent folder
- Save the TIFF files (.tif format) into the TIFF parent folder
Upload the renamed item folder to the AWBLA OneDrive
- Navigate to the CLIR-DHC Crabtree folder in the AWBLA OneDrive
- Double-click on the Photos-Negatives folder to open it
- Click Upload folder and select Folder
- Navigate to and single click the renamed item folder
- Click Upload to add the folder and subfolders to the Photos-Negatives folder in the AWBLA OneDrive
Adding Slides to OneDrive
Scanned slides saved in your OneDrive will need to be uploaded to the Slides folder in the AWBLA OneDrive.
Download the Slides folder structure
- Navigate to the CLIR-DHC Crabtree folder in the AWBLA OneDrive
- Click the box for the Slides folder
- This folder set is organized as follows:
- BeginHere-Item Name {Folder} (to be edited by you)
- Processed-JPEG {Folder}
- TIFF {Folder}
- BeginHere-Item Name {Folder} (to be edited by you)
- This folder set is organized as follows:
- Click Download and choose where to save the zip folder, if prompted
- Navigate to the downloaded zip folder (it should be named somthing like OneDrive_2021-10-28.zip)
- Right click the folder and select Extract All
- Click Browse, navigate to and click on your personal OneDrive, then click Extract
- Make sure the Show extracted files when complete box is checked
- Double-click on the Slides folder to open it
- Right-click the BeginHere-Item Name folder, select Rename, and type the Item Name (such as CE_B1_F2_Item430)
Scan slides directly into the renamed item folder in your personal OneDrive
- Scan slides and save coverted slides into their appropriate folders within the renamed item folder
- Save the JPEG files (.jpeg format) into the Processed-JPEG parent folder
- Save the TIFF files (.tif format) into the TIFF parent folder
Upload the renamed item folder to the AWBLA OneDrive
- Navigate to the CLIR-DHC Crabtree folder in the AWBLA OneDrive
- Double-click on the Slides folder to open it
- Click Upload folder and select Folder
- Navigate to and single click the renamed item folder
- Click Upload to add the folder and subfolders to the Slides folder in the AWBLA OneDrive
Adding 2D Photos to OneDrive
Images taken during 2D photography will need to be transferred from the memory card to the Desktop, from the desktop into your personal OneDrive with correct folder structure, then uploaded to the 2D Artifact Photos folder in the AWBLA OneDrive.
Transfer the photos from the memory card to the Desktop
- Create a blank folder on the Desktop
- Transfer the complete file set(s) over into it.
Download the 2D Artifact Photos folder structure
- Navigate to the CLIR-DHC Crabtree folder in the AWBLA OneDrive
- Click the box for the 2D Artifact Photos folder
- This folder set is organized as follows:
- BeginHere-Item Name {Folder} (to be edited by you)
- Processed-JPEG {Folder}
- Raw {Folder}
- TIFF {Folder}
- BeginHere-Item Name {Folder} (to be edited by you)
- This folder set is organized as follows:
- Click Download and choose where to save the zip folder, if prompted
- Navigate to the downloaded zip folder (it should be named somthing like OneDrive_2021-10-28.zip)
- Right click the folder and select Extract All
- Click Browse, navigate to and click on your personal OneDrive, then click Extract
- Make sure the Show extracted files when complete box is checked
- Double-click on the 2D Artifact Photos folder to open it
- Right-click the BeginHere-Item Name folder, select Rename, and type the Item Name (such as CE_CabinetA_D4_2394)
Transfer the photos from the Desktop into the renamed item folder in your personal OneDrive
- Double-click on the renamed item folder to open it
- Open the Desktop folder that includes the 2D artifact photos
- Copy the scanned images into their appropriate folders within the renamed item folder
- Copy the JPEG files (.jpeg format) into the Processed-JPEG parent folder
- Copy the Raw files (.cr2 format) into the Raw parent folder
- Copy the TIFF files (.tif format) itno the TIFF parent folder
Upload the renamed item folder to the AWBLA OneDrive
- Navigate to the CLIR-DHC Crabtree folder in the AWBLA OneDrive
- Double-click on the 2D Artifact Photos folder to open it
- Click Upload folder and select Folder
- Navigate to and single click the renamed item folder
- Click Upload to add the folder and subfolders to the 2D Artifact Photos folder in the AWBLA OneDrive
Adding Photogrammetry Photos to OneDrive
Images taken during photogrammetry will need to be transferred from the memory card to the Desktop, from the desktop into your personal OneDrive with correct folder structure, then uploaded to the 3D Artifact Photos folder in the AWBLA OneDrive.
Download the 3D Artifact Photos folder structure
- Navigate to the CLIR-DHC Crabtree folder in the AWBLA OneDrive
- Click the box for the 3D Artifact Photos folder
- Copy and paste folder called BeginHere-ItemNo
- This folder set is organized as follows:
- BeginHere-Item Name {Folder} (to be edited by you)
- Processed-JPEG {Folder}
- View 1 {Folder}
- V1-Level1 {Folder}
- V1-Level2 {Folder}
- V1-Level3 {Folder}
- View 2 {Folder}
- V2-Level1 {Folder}
- V2-Level2 {Folder}
- V2-Level3 {Folder}
- View 1 {Folder}
- Raw {Folder}
- View 1 {Folder}
- V1-Level1 {Folder}
- V1-Level2 {Folder}
- V1-Level3 {Folder}
- View 2 {Folder}
- V2-Level1 {Folder}
- V2-Level2 {Folder}
- V2-Level3 {Folder}
- View 1 {Folder}
- TIFF {Folder}
- View 1 {Folder}
- V1-Level1 {Folder}
- V1-Level2 {Folder}
- V1-Level3 {Folder}
- View 2 {Folder}
- V2-Level1 {Folder}
- V2-Level2 {Folder}
- V2-Level3 {Folder}
- View 1 {Folder}
- Test Shots-Errors
- Processed-JPEG {Folder}
- BeginHere-Item Name {Folder} (to be edited by you)
- This folder set is organized as follows:
- Right-click the BeginHere-Item Name folder, select Rename, and type the Item Name (such as CE_CA_D4_2394)
Transfer the photos from the SD card into the renamed item folder
- Double-click on the renamed item folder to open it
- In a separate window, open the SD card folder with associated object photos and move all associated files to the renamed item folder.
- Sort by file type
- Copy the photos, including the Start and Stop shots, into their appropriate folders within the renamed item folder
- Copy the JPEG files (.jpeg format) into the appropriate View and Level subfolders within the Processed-JPEG parent folder
- Copy the Raw files (.cr2 format) into the appropriate View and Level subfolders within the Raw parent folder
- Copy the TIFF files (.tif format) into the appropriate View and Level subfolders within the TIFF parent folder
- Each of the sub-folders, like Processed-JPEG > View 1 > V1-Level1, will have at least 26 files total
- This includes the 24 rotation shots, plus the Start and Stop shots
Processing 2D Photos
Processing images
Create a main object folder. Will be named as follows:
ex. CE_CD_D2 is Crabtree Collection, Cabinet D, Drawer 2
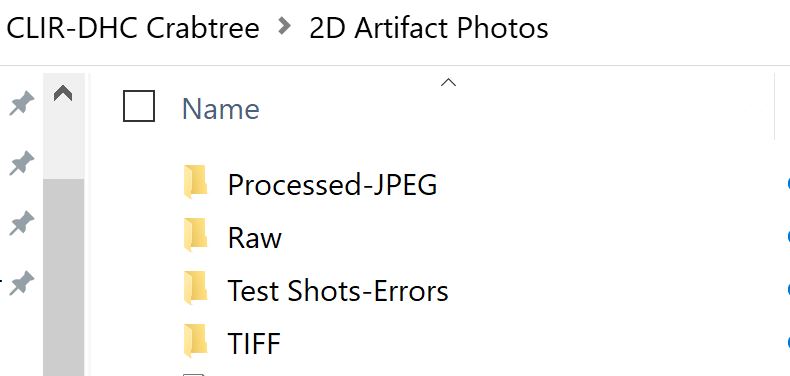
Within each main object folder create folders that match the image below.
Use the SD card reader to upload images to the JPEG folder and process within this folder.
From experience, it is easier to sort through images by editing first and then rename. Crop all images you wish to keep and do not edit those you do not want. All uncropped JPGs and their corresponding RAW files can be moved to the Test Shot folder. Then what is left simply needs renaming. RAW files are.NEF ANY image you do not use can live in the Test shots folder - better than deleting incase you move the wrong photo
Edit images
- Double click on photo in file explorer to open the image in Photos, the program we will use in this phase of processing.
- Rotate JPG images so CM scale is horizontal.
- Crop color bar out of JPG ONLY, RAW file stays the same.
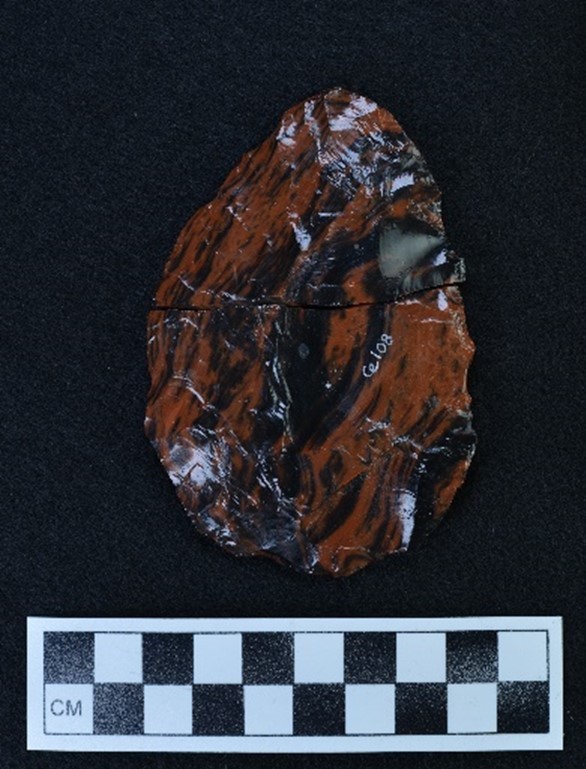
Refer to the image below to determine how to crop. Do NOT crop too close to the top of the artifact. Around the CM scale crop approximately 1/8” of “daylight”, just like in our document scans! Ensure this daylight is EVEN on right and left of CM scale, the bottom can be less.
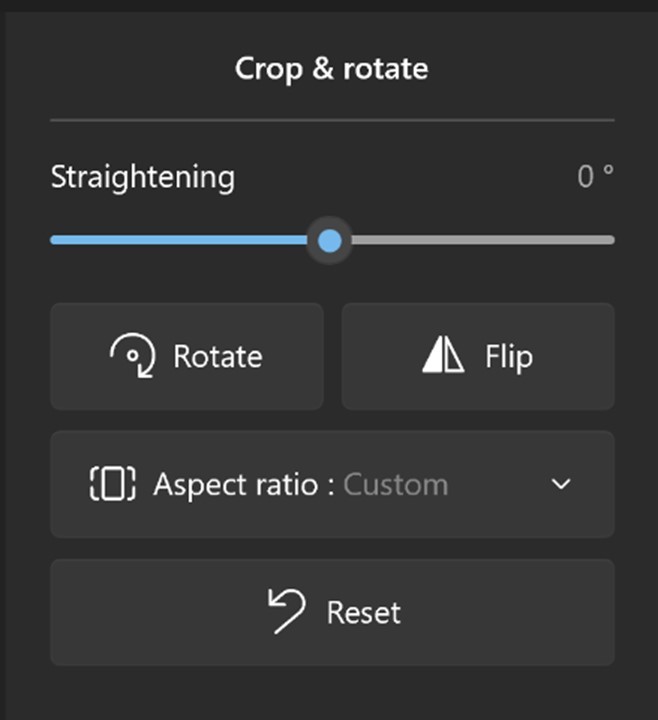
Straighten images as needed in Photos with sliding scale pictured below. This is not as precise as Photoshop, so use your best judgment.
Naming images
Each artifact will have 4 final images associated with it (sometimes more) 2 jpg and 2 raw (NEF) files.
Example of renaming: Artifact 1234 from Cabinet D, Drawer 4 will be “CE_CD_D4_1234-a”, “CE_CD_D4_1234-b” (use -c, d, e for subsequent views) for each file type.
Keep all JPG and RAW files in one folder - this allows for easier processing and renaming.
Once all images are renamed: sort images by type and move files to their corresponding folders.
Then TIF files will be created from the RAW files using Photoshop
- Go to “File” > “Scripts” > “Image Processor” and select your Drawers RAW folder to convert to TIFs
- Use “File” > > “Automate” > “Batch Process” to convert the TIFs from 300 to 600 dpi (our required dpi for the project)
List the file names in our Library Metadata List
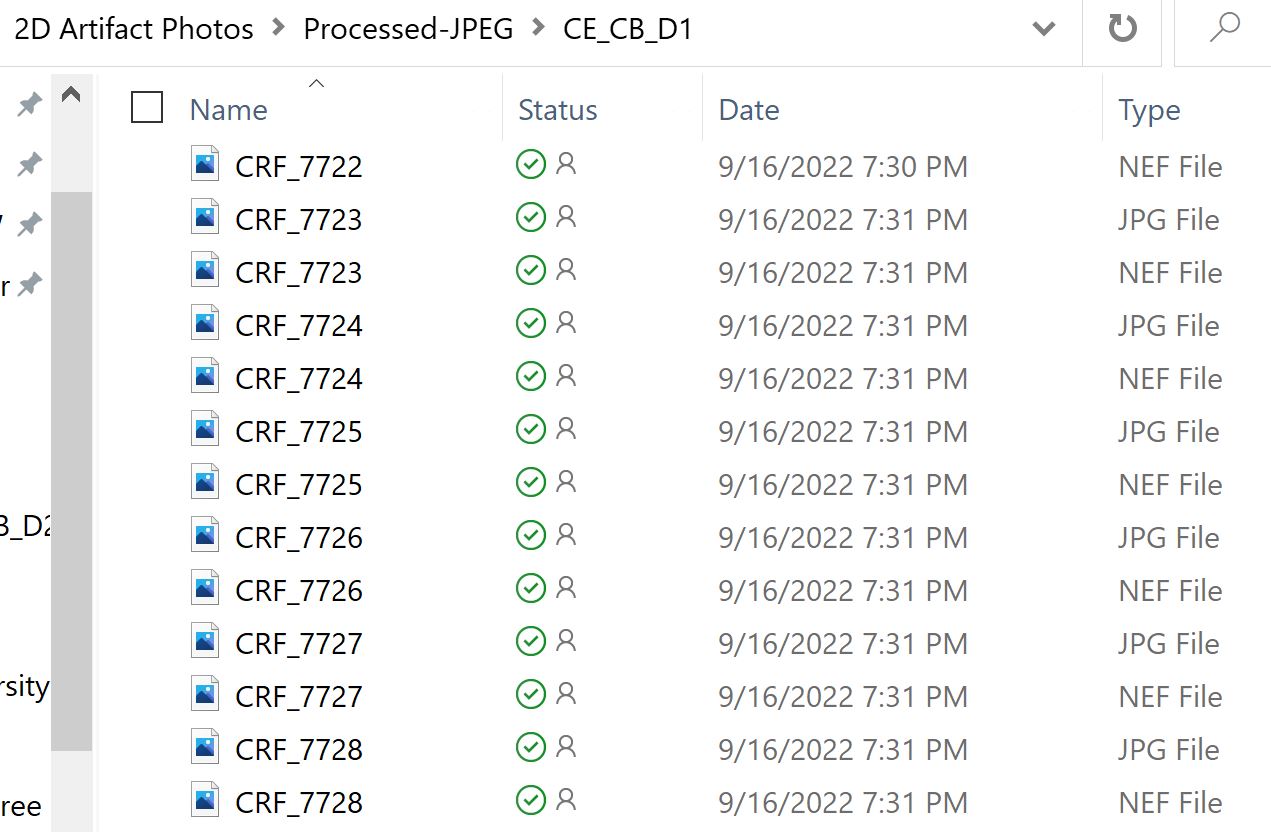
Copy and paste the directory link from File Explorer “C:\Users\yourname\OneDrive - University of Idaho\CLIR-DHC Crabtree\2D Artifact Photos\Processed-JPEG\CE_CB_D1” into a Internet browser. To select all use “Control + A” and then copy with “Control + C”. Paste these in an empty Excel sheet using right click to keep text only!
Open Find and Replace “Control + H” and type “.jpg” into the Find box and leave the Replace box empty this will leave our file names with the correct conventions. Copy and paste these rows into the “File Name” column in the correct library drop Excel sheet.
For the Date column, highlight the entire column and in the Find box type: ,* as we want to delete all information AFTER the comma leaving the date ex.”5/23/2022”. Once copied over to the Metadata sheet you will need to format the column to ensure it is in the correct format “2022-05-23”
To isolate the Catalog number and add Ce. preform these steps:
Copy the file name into the CatNumber column and Find and Replace everything except the Cat #. Example: for Cabinet D, Drawer 3 (CE_CD_D3_#-LETTER) type in to the Find box *“_“** (underscore) and then ”-*“ (dash).
From here, create a new temporary column. In the cell left of the first cat # type: =”Ce.”& then like other formulas select all boxes you want this to be applied to and hit Enter. Then highlight the results and hover over the edge of the column until you see the black four arrow pointer appear - DRAG with RIGHT CLICK to Cat # column and select “Copy as Values”.
Hard drive upload**
Photos will go loose into "2D-Objects" in "JPEG-Website" and "TIF" --------------
Adding 3D Agisoft Projects to OneDrive
Files and models created when using Agisoft Metashape will need to be uploaded to the 3D Projects folder in the AWBLA OneDrive.
Download the 3D Projects folder structure prior to starting a 3D project
- Navigate to the CLIR-DHC Crabtree folder in the AWBLA OneDrive
- Click the box for the 3D Projects folder
- This folder set is organized as follows:
- BeginHere-Item Name {Folder} (to be edited by you)
- Models {Folder}
- BeginHere-Item Name {Folder} (to be edited by you)
- This folder set is organized as follows:
- Click Download and choose where to save the zip folder, if prompted
- Navigate to the downloaded zip folder (it should be named somthing like OneDrive_2021-10-28.zip)
- Right click the folder and select Extract All
- Click Browse, navigate to and click on your own personal OneDrive, then click Extract
- Make sure the Show extracted files when complete box is checked
- Double-click on the 3D Projects folder to open it
- Right-click the BeginHere-Item Name folder, select Rename, and type the Item Name (such as CE_CabinetA_D4_2394)
Save the 3D project in the renamed item folder in your personal OneDrive
- Open Agisoft Metashape
- Click File > Save As
- Navigate to and double-click on the correct item’s folder in your personal OneDrive (for example: CE_CabinetA_D4_2394)
- Type the file name, which should include the cabinet letter, drawer number, and item number
- For example: CE_CabinetA_D4_2349_3Dproject
- Click Save
Upload the item folder to the AWBLA OneDrive
One the 3D project is complete:
- Navigate to the CLIR-DHC Crabtree folder in the AWBLA OneDrive
- Double-click on the 3D Projects folder to open it
- Click Upload folder and select Folder
- Navigate to and single click the appropriate item folder
- This folder should includ the following:
- An Agisoft project file (for example: CE_CabinetA_D4_2349_3Dproject.psx)
- A sub-folder with all of the files associated with the Agisoft project (for example: CE_CabinetA_D4_2349_3Dproject.files)
- A sub-folder named Models with the OBJ, STL, and X3D files
- This folder should includ the following:
- Click Upload to add the folder and subfolders to the 3D Projects folder in the AWBLA OneDrive