Scanning Procedures
Before you scan: Make sure that hands are clean and dry when handling materials for scanning or any type of digitization work; all materials should be handled with care, and cotton gloves worn when instructed by a supervisor. These items cannot be replaced or easily repaired if destroyed or damaged. Please also take care to avoid cutting yourself on the multitude of sharp edges presented by the points.
Why do we scan?
Digitizing materials by scanning them with a flatbed, large format, or feed scanner is sometimes the safest and most effective means of preserving the information in an item and allowing others to access it. Scanning items at a high resolution allows the digital capture to be used in different ways without needing to make any manipulations to the actual item. This is why we aim for a minimum 600 dpi image; it provides a scalable image that can be used for large or small reprints while maintaining the original details of the item.
Understanding DPI
DPI stands for “dots per inch” which is also commonly referred to as resolution. DPI relates to how accurately an image is sampled - an image with many millions of samping points will be able to resolve a finer level of detail than an image with only thousands or hundreds of points.
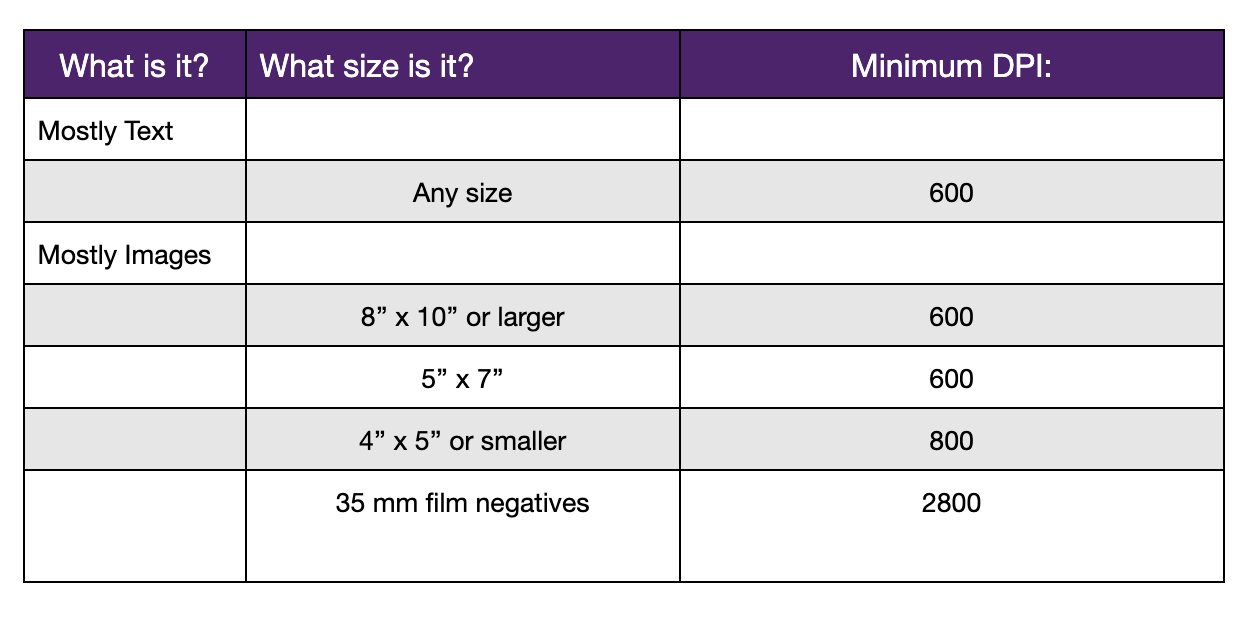
SCAN EVERYTHING AT AT LEAST 600 DPI
To ensure our scans are meeting archival guidelines, use the following DPI chart:
File Naming
A standardized file naming system helps us know exactly where an item came from or where it belongs just by looking at the file name. Scanned files should be named using the following standardized naming rules:
collectionabbreviation_box#__folder#-item#-subitem_-
Use CE for the collection abbreviation unless otherwise instructed.
For a one page document labeled “430” in Folder number 2 of Box 1, that is one page long:
The prefix = CE_B1_F2-Item430, the start number = 001, so the file name = CE_B1_F2-Item430-001.tif
If the document is multiple pages, the scans will turn out as follows:
CE_B1_F2-Item430-001.tif
CE_B1_F2-Item430-002.tif
…CE_B1_F2-Item430-078.tif
When you are preparing to scan, generate the prefix you will put into the scan box (“CE_B1_F2-Item12345-“) Then you can use the default numbering created by the scanning software to automatically create sequentially numbered scans for each page of the item, these numbers are called the start number. For example:
CE_B1_F2-Item12345-001.tif
CE_B1_F2-Item12345-002.tif
CE_B1_F2-Item12345-003.tif
Make sure to update the prefix and change the start number back to 001 when you switch to your next item!
Each prefix should include the unique identifier for that specific item. We want to avoid accidentally naming several distinct objects in a way that suggests it’s a single, multiple page object, instead of several separate objects.
Example 1: Imagine that items #123456 and #879123 are each one-page long letters. Here’s how the work flow should go:
Scan #123456 using the prefix “CE_B1_F2-Item123456-“ and start number “001”, creating a file named CE_B1_F2-Item123456-001.
Switch to the next doument, #879123, update the prefix to “CE_B1_F2-Item879123-“ and reset the start number back to “001,” creating a file named CE_B1_F2-Item879123-001.
Do not accidentally create CE_B1_F2-Item123456-002 by forgetting to update the prefix and start number boxes. The file name CE_B1_F2-Item123456-002 suggests #123456 is two pages long and effectively miscategorizes the scan for #879123.
Example 2: Imagine #123456 is three pages long and #879123 is two pages long. Here’s how the work flow should go:
Scan and create CE_B1_F2-123456-001 first, using prefix “CE_B1_F2-Item123456-“ and start number “001.” Scan each additional page creating: CE_B1_F2-Item123456-001, CE_B1_F2-Item123456-002, CE_B1_F2-Item123456-003.
When it you’re scanning a multiple page document, the Epson scanner should retain the correct prefix and update the start number to 002, 003, etc.
Switch to the next doument, #879123, update the prefix to “CE_B1_F2-Item879123-“ and reset the start number to “001.” Scan each additional page creating: CE_B1_F2-Item879123-001, CE_B1_F2-Item879123-002.
Each time you switch to a different folder, or a different box, make sure to update the appropriate part of the number you are creating for your prefix.
When you finish scanning, make sure to check the scanner to make sure not photos or documents are still on the scanner bed.
Scanning Images
Before beginning, create a personal folder in your one drive space that you can use to upload your scans. Inside that folder, create another folder called ‘tif’. This folder will be the destination for your initial scans.
-
Turn on scanner at station. Open EpsonScan scanning software.
-
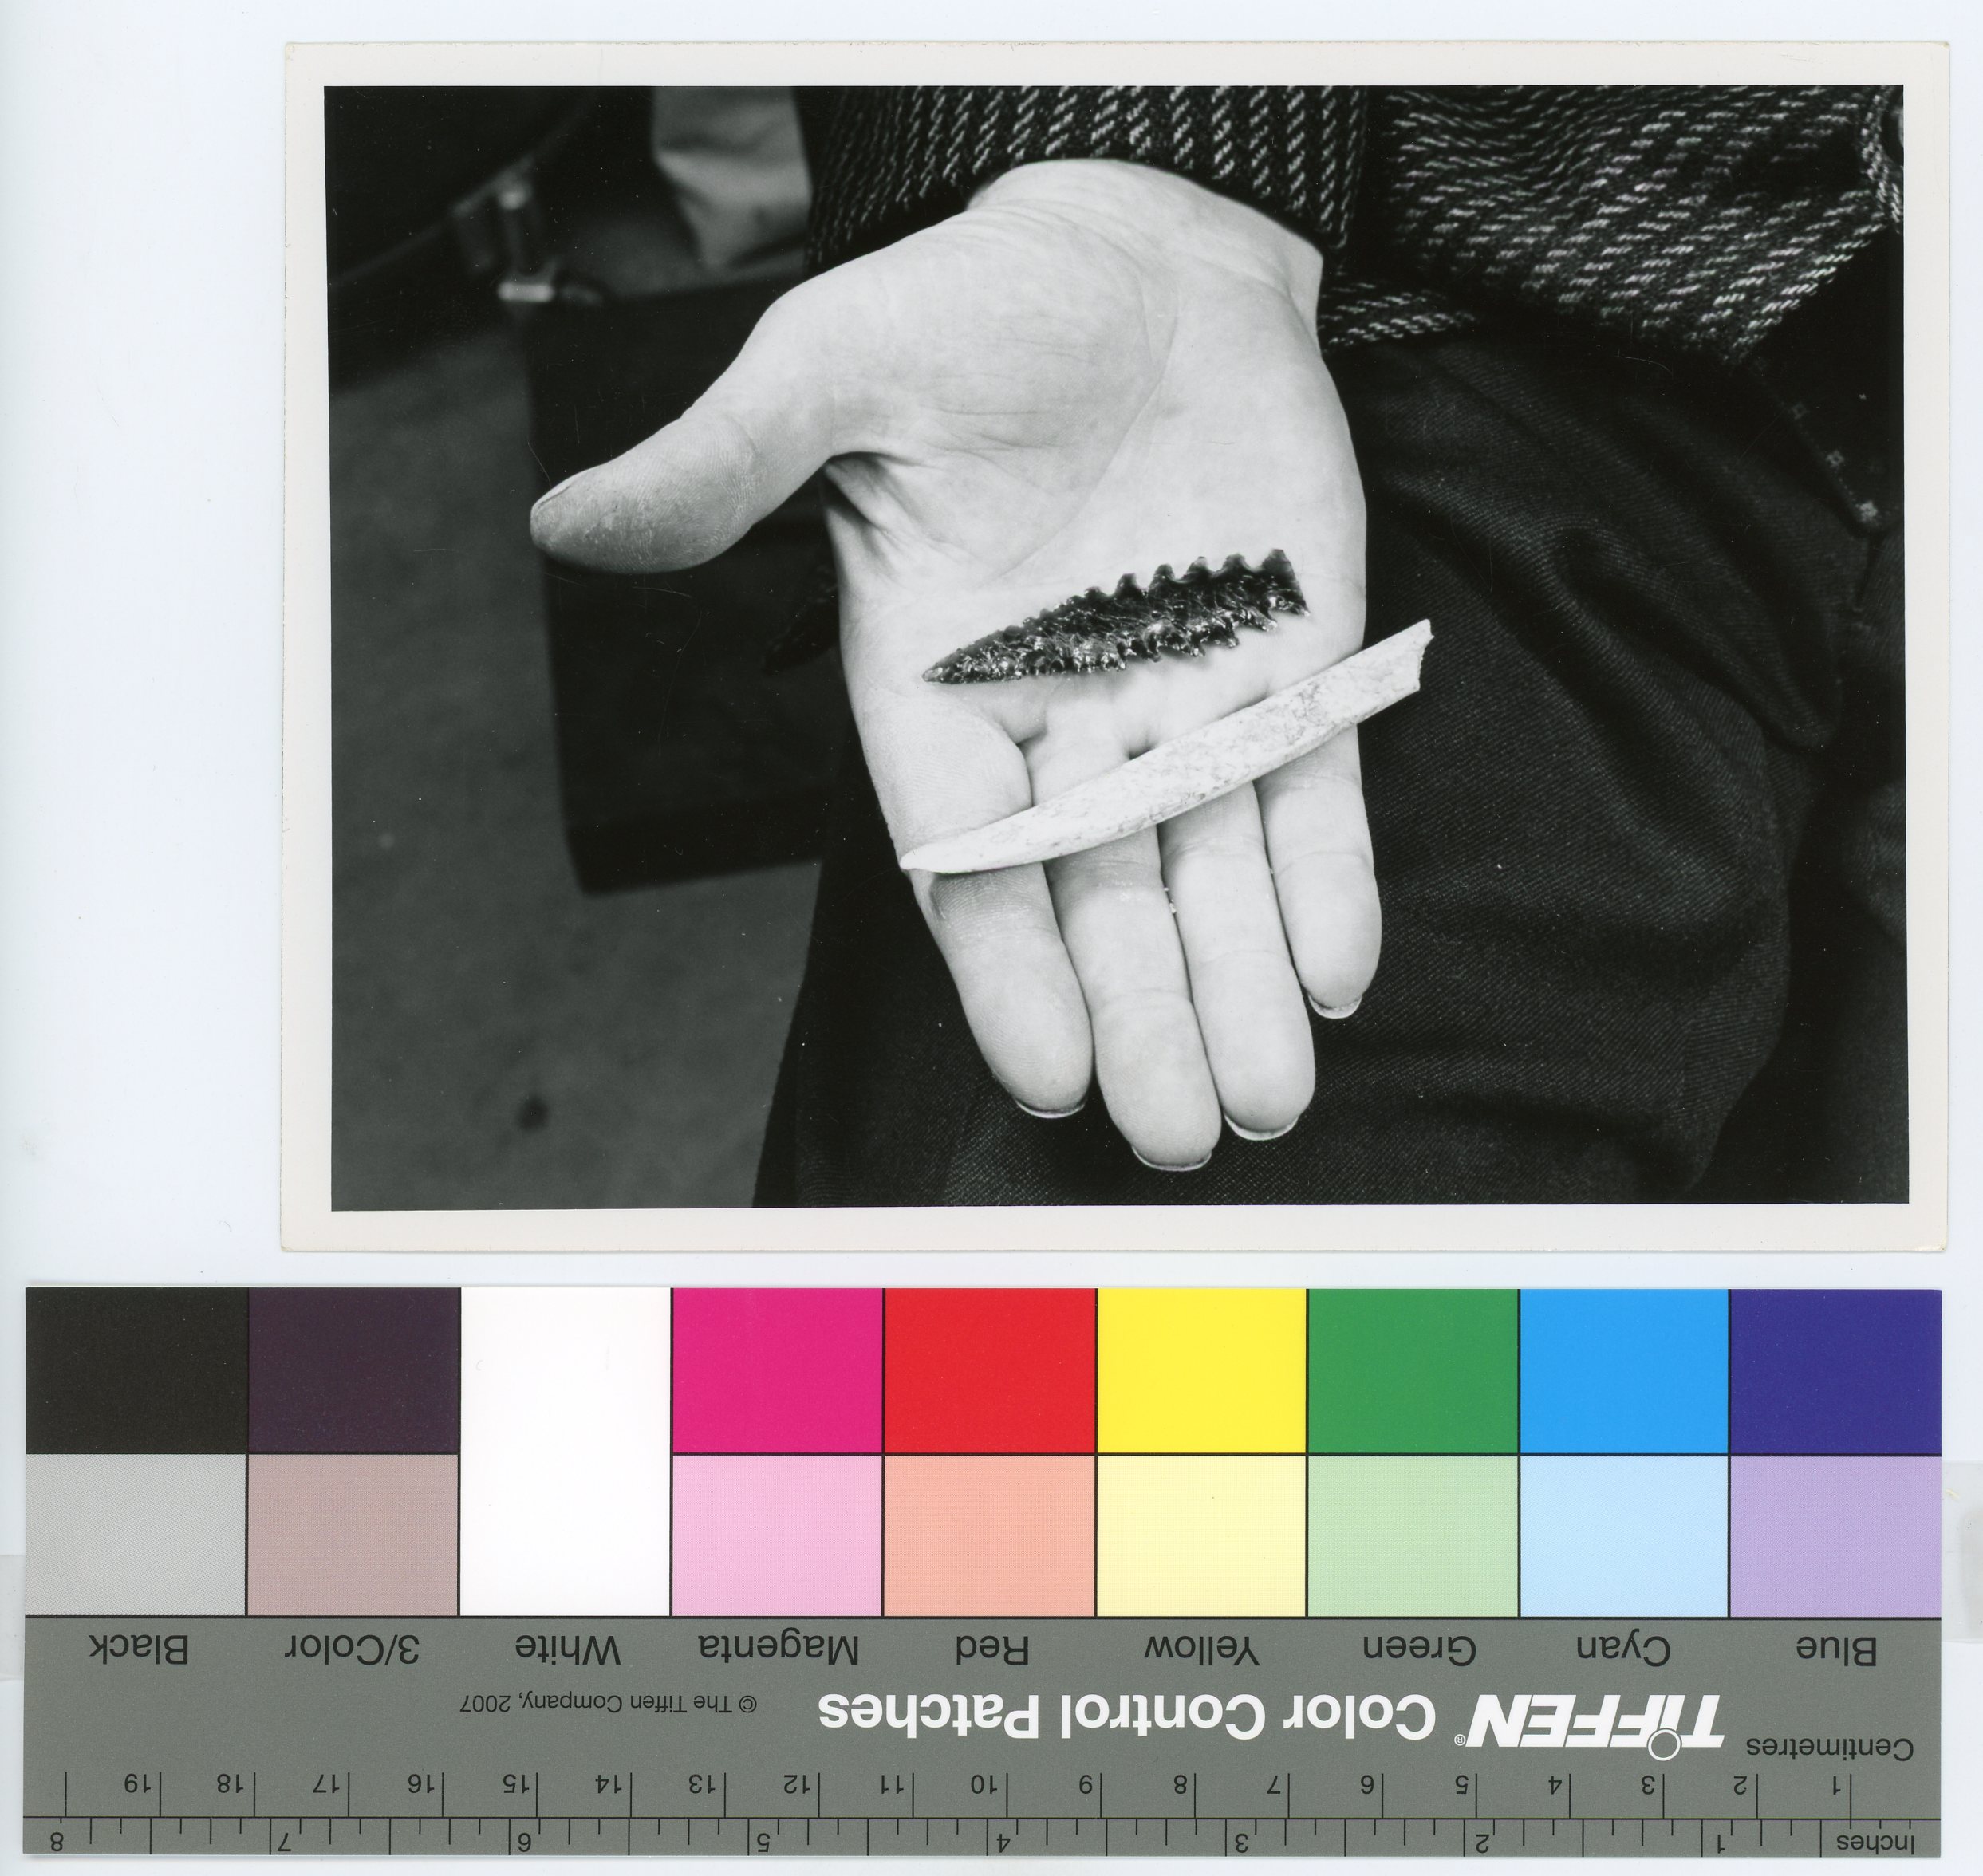
Place item to be scanned along the left side of the scanning bed (the glass plate), leaving a slight border between item and edge.
- Position the Color Bar so that the “saturated” (darker color portion) bar is facing the bottom the of the item
- Be sure to leave a ⅛-inch gap between the Color Bar and the item.
-
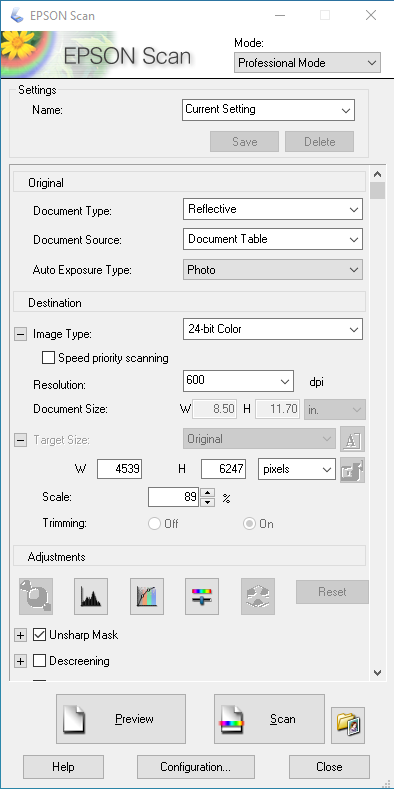
Close the scanner lid and press “Preview” in EpsonScan.
- Once the preview scan is finished, re-size selection window to fit 1/8” around document to be scanned
- Please include the whole Color Bar and DO NOT crop it.
- Images should be scanned at 600 dpi and should be at least 6,000 pixels on the long edge. This measurement is located at the bottom left of the preview panel. The color filter should be set to ‘none’. Make sure all your settings match as shown below:
- Once your settings are correct, press “Scan”. The “File Save Settings” window will pop up and you will need to:
- Click “Other” and then “Browse to select the file you want your scanned images to be saved to. This should be the tif folder you already created.
- Set up the File Name prefix. This should reflect the collection, box number, item number, and any other identifying characteristics like page numbers. See File Naming for complete details. The Start Number should be at 001 if you’re starting a new project, or set to the next sequential number if you’re in the middle of a project.
- In the Image Format section, the file type should be set to TIFF (*.tif).
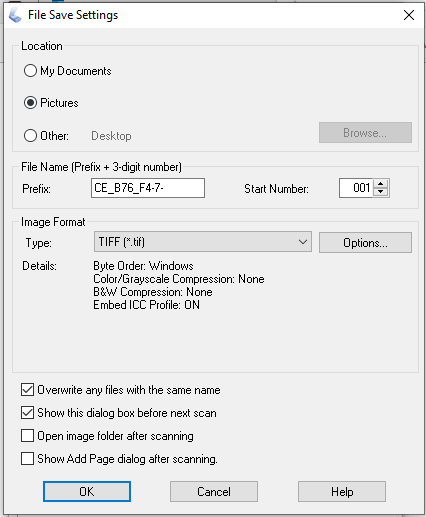
Make sure you update the prefix format as follows: CE_BoxNumber_FolderNumber-ItemNumber-
- Press “OK” and the scan will begin.
Scanning Documents
-
All documents should be scanned at 600 dpi with the color filter set to “none”.
-
From here, follow the same directions for scanning images. Depending on the size of the document and the scanner used, the Color Separation Guide should be used following the same guidelines recommended when scanning images (Color Separation Guides will not be used on the feed scanner. Use the standard File Naming conventions for scanning items.
-
Once a folder, box, or project is completely scanned, convert the files to JPEG using the Processing guide.